


Channeling a pitch polisher using a
soldering pencil
soldering pencil
Home
My telescopes
4-1/4" Travelscope
10" Classical dob
13" Truss
8" Two-pole
8" Moonsilver I
8" Moonsilver Iv2
12.5" Moonsilver II
18" Moonsilver III
18" Moonsilver IV
6" Moonsilver V
12.5" Captain Nemo
Other projects
Articles
Links
About me
Contact me
My telescopes
4-1/4" Travelscope
10" Classical dob
13" Truss
8" Two-pole
8" Moonsilver I
8" Moonsilver Iv2
12.5" Moonsilver II
18" Moonsilver III
18" Moonsilver IV
6" Moonsilver V
12.5" Captain Nemo
Other projects
Articles
Links
About me
Contact me

Ross Sackett's amateur telescope making
My telescopes and ATM Projects

I've wrapped the edge and bottom of
the hydrostone polisher base with
sticky blue masking tape to keep
things relatively clean, then made a
dam using low tack tape. I've put a
couple of marks at a height of 1/4" as
a guide to the thickness of the pour.
The blank sits on a granite tile that I
have levelled with a mill step block as a
wedge.
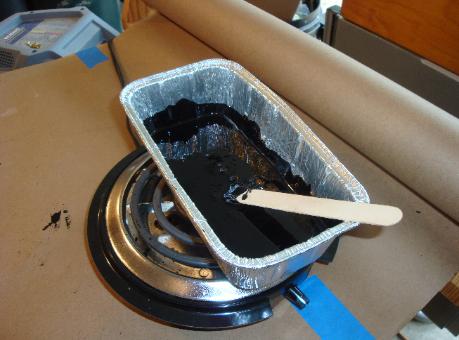
The pitch melting in a disposable
aluminum loaf pan. I like to get the pitch
pretty thin and let it sit there a bit to
release the bubbles, then let it cool a bit
(or just pour...). Don't let it smoke or boil,
though.
aluminum loaf pan. I like to get the pitch
pretty thin and let it sit there a bit to
release the bubbles, then let it cool a bit
(or just pour...). Don't let it smoke or boil,
though.

Pouring the hot pitch. Just pour it on
the center, and it should level itself.
Pour up to the 1/4" mark on the dam.
You can see on the surface of the
blank stains left by earlier laps. It is a
good idea to bake the blank for a
couple hours at 210 deg F to drive off
water that could interfere with the tape
sticking.
the center, and it should level itself.
Pour up to the 1/4" mark on the dam.
You can see on the surface of the
blank stains left by earlier laps. It is a
good idea to bake the blank for a
couple hours at 210 deg F to drive off
water that could interfere with the tape
sticking.
Almost there...
I don't think I let the pitch "cook" on the
hotplate long enough because a froth
of bubbles began to rise to the
surface. I liquified the surface with a
heat gun, releasing most of the
bubbles.
hotplate long enough because a froth
of bubbles began to rise to the
surface. I liquified the surface with a
heat gun, releasing most of the
bubbles.
The glassy-smooth pitch surface after
heating. Strip the tapes when it cools
to a taffy-like consistency.
heating. Strip the tapes when it cools
to a taffy-like consistency.
Sprinkle some cerium oxide on the
mirror, spray on a few drops of water,
and spread the slurry out with the
fingers. It should be form a relatively
uniform film of a rich paste. Don't let it
get too watery, otherwise the water can
collect and dimple the hot pitch.
Then tilting the mirror slightly so that
the pressure is on the edge of the
polisher, lightly press the mirror into
the still-plastic pitch. The goal is to
mound the pitch up a bit towards the
center. Go around the polisher a few
times, then center up the mirror and
press down, making the pitch conform
to the curve of the mirror. You may
need to lean in a bit to get good
contact.
I always get some creases and tears at
this point, so I play the heat gun over
the surface to melt it, then press some
more. This gives the polisher a much
more uniform surface.
this point, so I play the heat gun over
the surface to melt it, then press some
more. This gives the polisher a much
more uniform surface.

I run the lap under cool water to freeze
the pitch in place. Then with light
mallet taps on a thin metal blade I
knock off the overhanging lip of pitch.
Here I am using the end of a bench
scraper, but a putty knife works well
too.
I like to do the pitch work on a sheet of
cardboard with three sides folded up to
catch the chips and drips. Pitch makes
a mess. You need to try and stay
clean, being sure frequently to brush
the chips off your hands--pitch melts
around body temperature, so becomes
increasingly tenacious as time goes on.

Here's a picture of the rough trimmed
polisher in the pitch bin. I don't save
and reuse these chips for fear of
contamination.
polisher in the pitch bin. I don't save
and reuse these chips for fear of
contamination.
I plan out the pattern of channels on
some graph paper, extending the lines
out beyond the edge so that I can put
the polisher over the drawing and
transfer the lines.
some graph paper, extending the lines
out beyond the edge so that I can put
the polisher over the drawing and
transfer the lines.

Here's my channeling tool. It is a
soldering pencil originally used for
soldering stained glass window cames.
It has a broad chisel tip and puts out
plenty of heat.
soldering pencil originally used for
soldering stained glass window cames.
It has a broad chisel tip and puts out
plenty of heat.

With the polisher on the drawing, I use
a wooden straightedge to lay out the
channels. I run the soldering pencil
lightly along the straightedge, to just
mark the lines
a wooden straightedge to lay out the
channels. I run the soldering pencil
lightly along the straightedge, to just
mark the lines

Here are the X and Y channels laid
out. We don't need perfect uniformity
here.
out. We don't need perfect uniformity
here.

Propping the polisher on the edge of
the cardboard pitch bin, I start to melt
out the channels, starting at the lower
edge letting the melted pitch run down
the channel. I work my way up towards
the center line. You don't want a lot of
pitch running over the surface of the
squares, so I just do a half at a time. I
melt until I feel the soldering pencil
scrape against the hydrostone base.

Turn it over and finish the first set of
channels.
Then rotate 90 degrees and do the
perpendicular channels. It doesn't
look very good at this point, but much
of the irregularity is an illusion caused
by the lip of melted pitch along each
channel.
channels.
Then rotate 90 degrees and do the
perpendicular channels. It doesn't
look very good at this point, but much
of the irregularity is an illusion caused
by the lip of melted pitch along each
channel.

About 3/4 of the way there. The pitch
on the soldering iron will smoke a bit,
and sputter a little if you hit a pocket of
water from the pressing.
on the soldering iron will smoke a bit,
and sputter a little if you hit a pocket of
water from the pressing.

Once the channels are formed, i lay
the polisher horizontally and melt the
channels again to clean them up a bit
and to knock down the little pitch
"dams" formed by the cross-channels.
You are going to get a few drips on the
squares. These will press out, but try
to keep them to a minimum. I've tried
masking the squares with tape, but the
tape doesn't stick well to the
CeO-covered pitch surface.

Once the channels seem clean, I trim
up the edge using the soldering pencil,
giving it a slight bevel. This also helps
to seal any edges that might have
chipped loose when I rough-trimmed
the lap. It looks good, too.
up the edge using the soldering pencil,
giving it a slight bevel. This also helps
to seal any edges that might have
chipped loose when I rough-trimmed
the lap. It looks good, too.

A few last touch-ups, then it's time to
press.
press.

Now we move from the pitch-dusted
garage shop to the clean kitchen,
being sure to brush off any pitch chips
before I come inside. Both the mirror
and the polisher have been heated
under hot running water, then the
mirror smeared with CeO slurry.
garage shop to the clean kitchen,
being sure to brush off any pitch chips
before I come inside. Both the mirror
and the polisher have been heated
under hot running water, then the
mirror smeared with CeO slurry.

After about ten or twenty minutes of
pressing under weight the melted lips
and drips on the squares should be
mostly leveled out. A little longer, and
the squares should begin to come into
good contact.
pressing under weight the melted lips
and drips on the squares should be
mostly leveled out. A little longer, and
the squares should begin to come into
good contact.

Once the pitch is fairly cool I press with
some mesh to microfacet the squares.
Don't go too long here or you will press
the mesh too deeply and pull up chips
when you remove it.
I stripped the tape off the base,
washing the lap carefully to remove
any small chips of pitch.
some mesh to microfacet the squares.
Don't go too long here or you will press
the mesh too deeply and pull up chips
when you remove it.
I stripped the tape off the base,
washing the lap carefully to remove
any small chips of pitch.

Almost there. A bit more pressing and
polishing can begin. Or just start
polishing to warm up the lap a bit. It
will probably need to be microfaceted
again pretty soon.
polishing can begin. Or just start
polishing to warm up the lap a bit. It
will probably need to be microfaceted
again pretty soon.