| 8" Moonsilver I single-pole travelscope |
Home
My telescopes
4-1/4" Travelscope
10" Classical dob
13" Truss
8" Two-pole
8" Moonsilver I
8" Moonsilver Iv2
12.5" Moonsilver II
18" Moonsilver III
18" Moonsilver IV
6" Moonsilver V
12.5" Captain Nemo
Other projects
Articles
Links
About me
Contact me
My telescopes
4-1/4" Travelscope
10" Classical dob
13" Truss
8" Two-pole
8" Moonsilver I
8" Moonsilver Iv2
12.5" Moonsilver II
18" Moonsilver III
18" Moonsilver IV
6" Moonsilver V
12.5" Captain Nemo
Other projects
Articles
Links
About me
Contact me


Merit Award, RTMC 2006


Ross Sackett's amateur telescope making
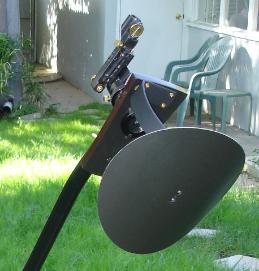
Moonsilver I, seen on the right, was the first of my series
of single-pole portable telescopes. I built it during the late
spring of 2006 in preparation for the summer star parties.
Following the success of my two pole "Stellascope" I
realized that a scope with a wider single pole should have
mechanical advantages over cantilever designs with two
or more poles. So I started sketching out a number of
single-strut options. One early plan became the Saraguro
travelscope, though this wasn't actually built until after
Moonsilver I. The Moonsilver I design emerged after I
explored about four other single-pole designs on paper.
It uses the same hybrid dob-fork mounting design that I first used in the
Stellascope, with a dobsonian trunnion on one side and a pivot on the
other. When the telescope is vertical a single latch locks the altitude arc
to the rocker so that the scope can be carried one-handed by grabbing
the pole.
The telescope was built of baltic birch plywood covered with Honduras
mahogany veneer, with some solid mahogany. It was finished with dark
grain filler and a red mahogany stain, topcoated with wiped on
polyurethane. Most of the exposed hardware is brass. The single pole is
1" OD 1/16" wall aluminum.
You can see that I adapted design on the mirror box lid for the banner
running across the top of my webpages.
The mirror cover is hinged to the shallow mirror box and is latched for
transport. During use it is held open by a rare earth magnet.
The telescope uses the same 8" f/4.5 mirror set as the Stellascope and
the Saraguro travelscope. It rests on three adjustable thumbscrews for
collimation, with two pads 90 degrees apart for edge support. A safety
bolt is RTVed to the back of the mirror so that safety clips aren't needed.
A knurled nut snugs the mirror against the cell for transport, but this is
loosened for observing to avoid distorting the mirror.
The altitude and azimuth dob bearings are Ebony Star laminate running
on Teflon pads. The altitude and azimuth pivots are stainless steel
machine screws run through bronze bushings, with Teflon washers.
They are both tightened by plastic star knobs with nylon insets so that
friction can be maintained without the knobs loosening.
The telescope weights 14.5 pounds, including optics.
This shows the "fork" side of the hybrid mounting. It has three
advantages over a conventional dobsonian mount for this kind of
telescope. It allows the scope to be locked to its base using a single
catch for easy carrying. The pivot also allows me to "dial-in" the friction
to adjust for eyepieces of different weights, critical for any small scope.
And the "stock" carrying the pivot provides a firm attachment point for the
single aluminum pole.
Set up on a table, the focuser is angled downwards (at about a 45
degree angle to the axis of the scope) for ergonomically comfortable
viewing. For this design getting that angle right forced me to use a
curved pole, which adds a graceful sweep to the scope.
The upper end of the scope is pretty simple, consisting of a focuser
board, helical focuser, red-dot finder, secondary mirror assembly, and
light baffle. Not seen here is the variable iris baffle at the base of the
focuser.The light baffle is Kydex plastic lined with black velvet. It is
located in the lightpath to minimize its size, but since the primary sees it
edge on it has minimal impact on the brightness of the image.
The curved baffle and secondary stalk eliminate obvious diffraction
spikes, but do contribute to a diffuse cloud of diffracted light around
bright objects. Three thumbscrews collimate the secondary mirror.
Here's the top end from the opposite direction. You can just see the
variable iris focuser baffle. You can also see part of the curved 1"
aluminum pole (painted satin black). The complex curve shows up better
in the photo at the top of this page. To get the bend I jigged up the
mirror box and focuser board in their appropriate positions, then bent the
pole by hand bit-by-bit until the ends of the pole fit the rail joints on the
stock and the focuser board. (I later found that all it really needed was a
simple S-bend, with the ends of the pole parallel to one another. By
rotating the pole, and the focuser board, the secondary mirror can be
brought directly over the main axis of the primary. Then holes can be
drilled in the pole to attach it using two machine screws.)
The scope is surprisingly stiff, with only 1/3 Jupiter diameter vibration
while focusing, and 2/3 Jupiter springback while tracking.
Why the name "Moonsilver"? While sketching out the design at the
beginning I noticed a vague kinship to some of Alan Lee's designs for
The Lord of the Rings movies, especially for the elven town of Rivendell.
I decided to explore that, making the sort of telescope Elrond might have
on his patio table. The sweeping lines and recurved profiles were one
result. Another is the design on the mirror box cover. It is based loosely
on the trees in Tolkien's own sketch of the Moria gates, here
re-imagined as stylized intertwined branches on the rete of an elven
astrolabe. The design was excecuted in Alvin labmetal inlay, burnished
to a pewter sheen. An elven scope needs an elven name. "Moonsilver"
is a loose translation of Tolkien's mythical element ithildin, a metal that
mirrors only moonlight and starlight.
This was my first RTMC-- definitely a different kind of crowd than
Stellafane, but I enjoyed it just as much. I was surprised how much of
the upper field had been given over to vendors. Not knowing better, I
set up in the "plaza" enclosed by the vendor's tents, which brought lots
of people by to look at Moonsilver. (Many seemed to be disappointed I
wasn't offering them for sale. HUGE ego rush.) The competition judging
went well, and at the ceremony that evening Moonsilver was awarded
one of six Merit Awards. I am told it did well in the voting for
Astronomer's Choice, as well.
First-light of the scope was the day before I left for L.A. to attend my first
RTMC. I was delighted with how well the telescope worked--I am sure
that my earlier experience with the Stellascope helped forestall any
mechanical or optical issues. The scope breaks down into six
components which fit into a nearly legal carry-on bag. I can assemble
the scope toollessly in 4 minutes 45 seconds, plus the usual collimation
time. The telescope hold collimation well during and observing session,
and is usually requires only a little tweaking after assembly.
My telescopes and ATM Projects


Here's the back to show the general arrangement of the primary
support. Three knurled thumbscrews support the primary from
behind. Instead of safety clips, a 1/4-20 bolt is RTVed to the back of
the soda lime primary. A knurled nut fixes the primary in place for
travel, which is loosened for collimation and use. The edge support is
two nylon machine screws (with the heads removed) supporting the
bottom edge of the primary 45 degrees either side of vertical.